
Balloon Set-up Process
"Sail the winds in a dream come true..."
Join Captain-Crystal and her Flight Team
Below is one example of a process we follow for the INFLATION of the hot air balloon system. The balloon system is very adaptable to minor changes for the day's flight schedule. The actual set-up of the balloon can vary depending on weather and launch site. As the Flight Team knows, the Pilot-In-Command (PIC) is the one who will assess the weather and choose the location of the launch site. The PIC will instruct each inflation, if needed. Otherwise, the Flight Team Captain will be in command of all set-up procedures. However, all decisions are made by the PIC of each flight and may supercede that of the Flight Team Captain. After all, it is the PIC who ultimately is responsible to ensure the safety of all Flight Team Members and Passengers. The overall set-up time also varies. This could be anywhere from 15 to 30 minutes.
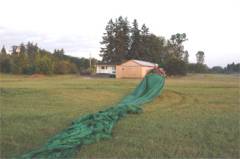
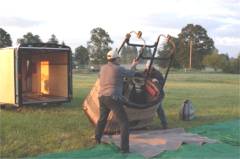
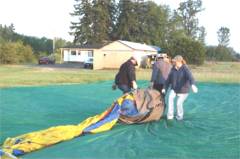
We start by pulling out the green TARP made of polyurethane nylon This grey envelope bag is stored in the nose of the trailer. Not all fields will be tarped. Only those with gravel, dirt, and debris.
If the grass is very damp, it is used to help allow the balloon envelope to expand without dragging and weighing down on the wet surface.
After the balloon has launched, the tarp is stuffed back into the envelope bag with a tail left out. This makes it easier to pull it out the next time it is needed. DON'T TAKE THE TIME TO FOLD IT...save your energy.
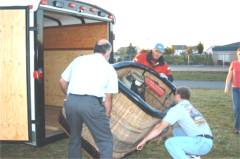
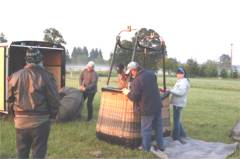
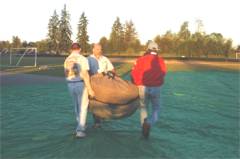
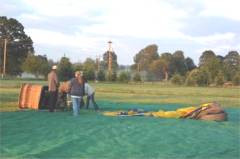
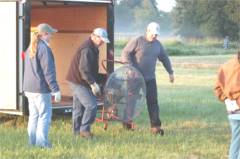
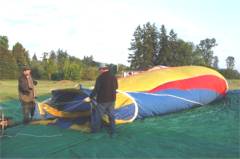
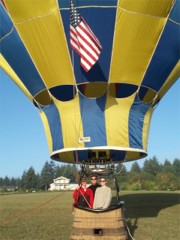
The BALLOON BASKET is pulled halfway from the back of the trailer and TILTED down until the bottom corner touches the ground. It is balanced in this position as another flight team member drives the trailer forward approx. 7 feet and clear of the basket. Then the basket is gently set on its bottom without scraping the edge of the trailer. PLEASE DO NOT ATTEMPT TO LIFT THE BASKET (as demonstrated above).
The basket should be facing downwind when pulled from the trailer. This means the red fire extinguisher will be on the driver's side (stage left). If this is not the case, the basket needs to be turned clockwise until it is facing the correct position.
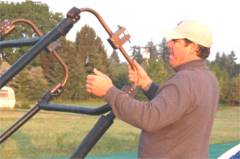
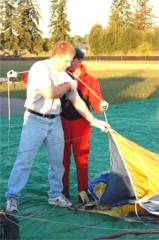
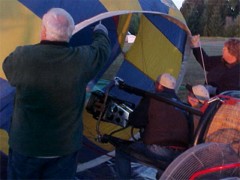
Next, the BURNERS and BLANKET are pulled from the BASKET and set aside. PLEASE NOTE: Special care must be taken when handling the burners. This is because the burner valves are fragile and easily bent. Place burners standing on their heads, with the zipper on top, and away from the UPRIGHT assemble.
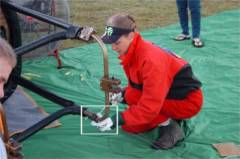
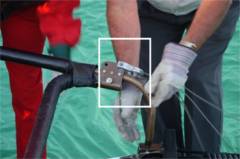
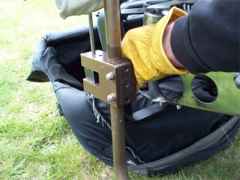
Next, bring the UPRIGHTS out from the trailer. Locate the numbered holder in the basket corners (you will notice that they will match the numbered bottoms of the uprights). Carefully lift the uprights and place one pole into the corresponding holder located in each corner of the BASKET.
Make sure the NUMBERS 1-2-3-4 on the bottom of the uprights correspond with the numbers 1-2-3-4 on the corner of the basket. When placing the uprights into the basket slots, do not pull down on the leather uprights. This will pull the velcro apart. Instead, place your hands on the cross bars and pull down. When the uprights are settled in their slots, put both PINS into the bottom of the uprights by pushing the button to release the catch, slide through the upright assemble, place the KEEPER onto the end, then release the button. (Be aware, there are two pins to each upright.)
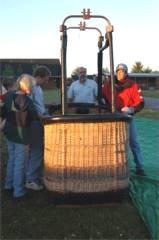
Don't be shy to ask for help. The uprights won't be able to be pinned if placed into the wrong slots. When you have the job done, the uprights will stand straight and tall in their position, pinned, and ready for flight.
Now, what to do with that BLANKET? It is placed under the basket and on top of the tarp. This will help protect the basket leather and keep debris out of the wicker. Easy enough. (As seen above, notice the placement of the grey burner bag...away from the basket system. This will also be the side the fan will be placed later.)
The HOSES to the propane tanks are then "wrenched" from the REFUELING ADAPTER by the PIC or FLIGHT TEAM CAPTAIN and velcroed next to the closest upright. The threads use the "high pressure tight/low pressure loose" method. Make sure the end of the hose does not touch the ground. We don't want dirt and debris pushed into the burner system.
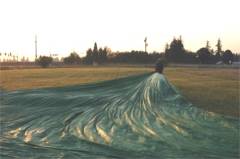
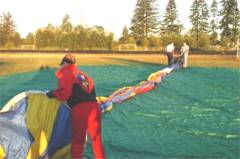
Now for the ENVELOPE BAG. Several team members are needed to carry this from the back of the trailer to the tarp. Place it downwind from the basket approximately 15 feet.
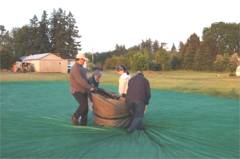
The envelope bag is tied closed with a "DAISY CHAIN". Just pull the small rope and the threads will untie themselves. Watch how the rope is intertwined with the bag so you can put it back the way it was found.
The flap should be facing away from the basket or as we like to say DOWNWIND.If the flap is not facing downwind when the daisy chain is undone, have each team member grab a handle and walk CLOCKWISE until it is correct.
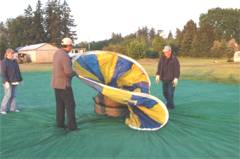
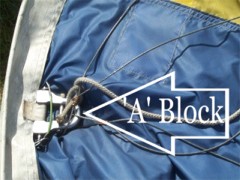
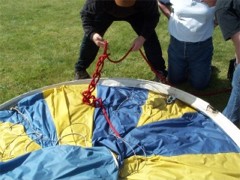
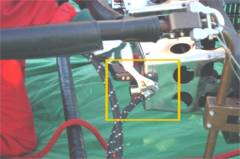
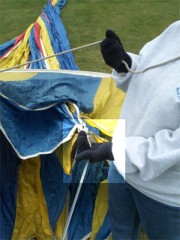
The SKIRT or HOOP is then unwound from the envelope bag and held vertical to check the placement of the A BLOCKS. The A BLOCK is attached to the skirt by a pin and hold the FLYING WIRES or CABLES.
The two cable sets on the ground contain the RED LINE (red rope) and should be on the vehicle 's driver side
and WHITE INSTRUMENT CABLE should be on the passenger side. If the red line and instrument cable are not in their appropriate location on the ground, check to see if the THROAT is twisted. If so, untwist it by turning the skirt one complete rotation. If this does not work, seek further assistance from the Flight Team Captain or PIC.

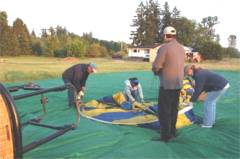
The bottom two cable sets (instrument and red line) should be pinned onto the bottom UPRIGHT connections first. Remember to push the pin's blue button located on the A Block. This will release the catch and allow the green KEEPER to be released. The A block is inserted into the top hole of the upright with the keeper brought around to the inside and secured back onto the A block. The RED LINE will line up on the bottom driver's side. The instrument cable will line up with the passenger side on the bottom.
We like to place the bottom cables first because the weight of the BURNERS will drive the uprights into the ground. This causes the flight team to have to lift the uprights in order to place the pin. So, starting with the bottom cables here are the steps...
- Make sure the cables are not twisted. If they are, ask for assistance from the Flight Team Captain or PIC.
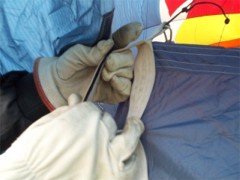
- Push the blue button on the pin head and pull the A Block from the Skirt;
- Place the A Block on either side of the top hole of the upright connection;
- Slide the pin through the A Block and upright;
- The safety cable will go to the inside of the upright allowing the keeper on the outside of the pin
Now, release the blue button and repeat. Whew!
PLEASE DO NOT PUT THE PIN ON THE GROUND. They are hard to see and expensive to replace.
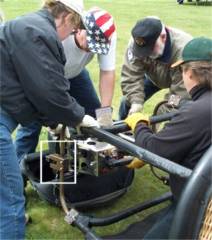
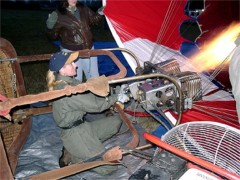
Unzip the grey burner bag and gently lift the BURNERS placing them into the upper holes of the UPRIGHTS as in the diagram above. The BURNERS are heavy, so ask for help in lifting them into place.
The large RED knob or WHISPER VALVE located at the bottom of the burners will be placed on the driver side, opposite the fan. These are also pinned in place. Make sure both ends of the burner are placed at the same time. Never drop one side or the other.
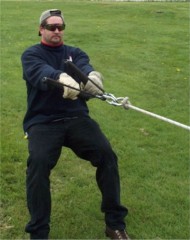
The PIC or Flight Team Captain should be the only member to CONNECT the burners to the hoses. Only 5 pounds of pressure is needed when "wrenching" the hose in place. That means the burners will move slightly when 5 pounds is applied using the wrench. Now that the basket is facing downwind, and the cables are connected to the basket, the burners and hoses are connected, the SAFETY TIE is connected from the upright to the vehicle, and the balloon envelope is ready to be pulled out of the envelope bag. (NOTE: We always use a safety tie, even in the calmest of weather conditions. This safety tie is to be placed by either the PIC or Flight Team Captain.)
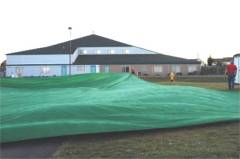
Have two or three flight team members grab the handles on either side of the ENVELOPE BAG, lift slightly, and DRAG downwind. (Note: This is standard procedure, but there may be times when the PIC will have the envelope "BLOWN" from the bag with the INFLATOR FAN.)
This allows the envelope to release slowly from the envelope bag. At this time you will notice the envelope is tied every 10 feet. Consult with the Flight Team Captain or PIC to see what kind of inflation will be used. Sometimes the ties will be pulled off prior to the inflation process and sometimes they will be left on and pulled gradually while the fan throws cold air into the envelope.
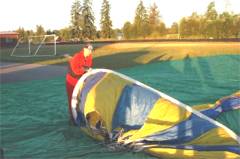
After the envelope is "streamered out", pull the CROWN LINE from the bag and walk forward to the extent of the rope. A "SKI TOW" is then carabinered on the end of the crown line. This crown line will assist the stand up of the envelope when it is fully COLD PACKED and ready for HOT INFLATION. Make sure you fold the envelope bag up nicely so no grass will get into the bag and place in the trailer.
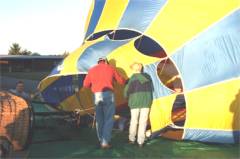
Next, the skirt is pulled downwind under the balloon envelope. This is easier with two team members.
- Note: We are about to proceed to the THROAT OR MOUTH of the balloon system. Please remember gloves and long sleeves will be needed for these positions. Refrain from wearing nylon jackets or pants and sandles (especially the slip-on variety).
Two team members will be stationed at the THROAT or MOUTH. On the passenger or FAN SIDE (cold side), position your left foot on the cable close to the SKIRT. DO NOT STEP ON THE FABRIC OR THE WHITE INSTRUMENT LINE. As seen above, take the HANDLING LINE over your left shoulder and hold the cables with your right hand palm facing up. This allows for a quick detangle. Do this mirrored or opposite for the driver's side throat position.
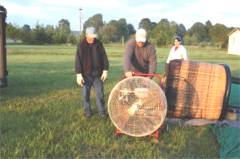
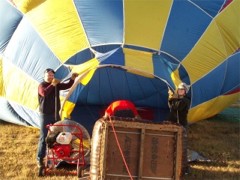
The INFLATOR FAN is brought from the trailer. This should be a two member job so that no one receives back strain. Make sure the fan is never tipped on its back or front. The standing position as seen above is the only way the fan should be transported or stood.
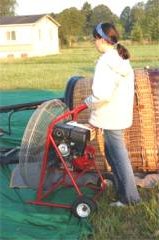
The INFLATOR FAN is faced away from the balloon system, started, and run up to speed for a test. Then it is shut off and set facing DOWNWIND, facing the envelope, and next to the basket on the passenger side. Do not bend over the fan with a scarf or open jacket that can be "sucked" in by the blades. The fan should never be moved while operating (rotating). If you have long hair, make sure it is tied back.
The INFLATOR FAN is positioned on the LEFT or passenger side of the basket. The CAGE does not extend beyond the black leather top of the basket. The flight team member has both hands on the fan and long hair is pulled back. Bring earplugs for extra protection. The fan is the MOST DANGEROUS part of the inflation and should always be kept in an upright fashion.
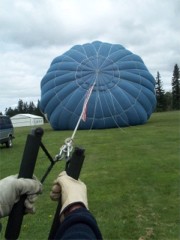
Now the INFLATION PROCESS begins. We have two flight team members on the THROAT of the envelope. Gloves, long sleeves, and natural fabrics should be worn when on the throat. Notice the hand positions. Always use an underhand grip on the "flying wires" or CABLES. The other hand holds the HANDLING LINE which is never wrapped around the hand. Again, the fan can be noisy, so we recommend bringing along earplugs for extra protection. If wearing a baseball cap, consider wearing the cap backwards to keep it from blowing into the envelope.
The fan will begin in a lower speed. Those at the throat or mouth must remember to step on the clips, not on fabric or cables. At the same time, flight team members will be opposite the fan at the crown (top of the balloon) attaching the velcro to the parachute top.

Once attached, the fan speed will be increased to allow for a full "COLD PACK" of the envelope.
A "THUMBS UP" sign will be given to the FAN operator when full speed should be applied. The CROWN LINE will be held taunt by a flight team member. The SKI TOW attached to the end of the crown line will maintain control of the envelope during COLD INFLATION, as well as HOT INFLATION. The crown line will keep the envelope from rolling or rising too quickly during the HOT INFLATION. (However, do not be surprised if the PIC or Flight Team Captain requests the envelope be "rolled" to and fro during the cold inflation to help the inflation process.) With the fan on full it doesn't take much time for the envelope to COLD PACK
When the lines at the THROAT grow taunt, gently pull the SKIRT out from under the envelope and into the open position. Now we are ready to add heat. You will be able to just hold onto the HANDLING LINES (the little white ropes) to keep the THROAT open. Your feet will not have to stand on cables or the skirt. The fan will be turned down to half speed by the fan operator. This is the signal the "hot inflation" will commense. Make sure you keep eyes on the PIC during the hot inflation for any emergency instructions.
We are ready to begin HOT INFLATION. Be aware once the hot inflation begins, there will be noise and heat from the burners. If you are posititioned on the THROAT, do not drop the HANDLING LINES (as pictured above). Make sure your long sleeves are pulled over your wrist before the heat is applied to the envelope and watch the PIC for additional instructions during the hot inflation.
The flight team member at the FAN will be instructed in advance by the PIC or Flight Team Captain of the signals to decrease speed and shut-off fan while HOT INFLATING. Remember: The driver's side is the COLD SIDE and the passenger side is the HOT SIDE.
During the HOT INFLATION, the balloon will gently rise when the hot air is applied to the cold pack. As the envelope rises, the basket may move so watch your toes. Once the balloon is upright the PIC will request for "WEIGHT ON". At this time, ahold of the HANDLING LINES, "belly up to the bar" (or lean onto the basket), and apply your weight to the basket.
Now, we are ready to board passengers. Please, wait for the PIC to secure the aircraft and instruct you when to get a "leg up" into the basket. Foot steps are located on both sides of the basket. NO ONE IS TO RELEASE THE SAFETY TIE-OFF UNLESS INSTRUCTED BY PIC.
And now it is UP, UP, and away.
Soft landing. CC